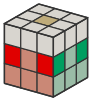
First layer done. Hold the cube white on the bottom, yellow on top — the solved layer stays at the bottom from here on. This step fills the four middle-layer edges. No new algorithms: every insert is built from righty and lefty.
Find an edge
Scan the four top-layer edges for one with no yellow on either sticker — that edge belongs in the middle layer. Any edge showing yellow lives on top; skip it.
Turn U until that edge’s front sticker sits directly above the center of the same color, and turn the whole cube so that face is toward you. Together with the solved bottom row, the front face now shows an upside-down T in one color. That T is your starting position for every insert.
Read the direction, then insert
Now look at the edge’s top sticker. It matches either the right or the left center — that is the slot it belongs in, and it picks the insert:
Points right
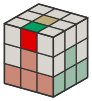
U, then R U R' U' (righty), then y, then
L' U' L U (lefty).
Points left
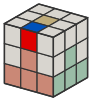
U', then L' U' L U (lefty), then y', then
R U R' U' (righty).
y rotates the whole cube like a U turn — the right face swings round to
face you; y' is the reverse.
Why two triggers? No move drops an edge straight into a middle-layer slot, so the insert borrows the solved corner beside it: the first trigger takes the corner out and the mirrored one puts it back.
When the edge is stuck in a slot
Sometimes an edge you need is already in the middle layer — wrong slot, or right slot but flipped — and nothing usable is left on top. Evict it: hold the cube with that slot at the front-right, put any top-layer edge above the front center, and run the points-right insert. Inserting the new edge pops the stuck one out to the top layer, where you can solve it properly.
Repeat until
Loop the step — find a yellow-free edge, form the T, read the top sticker, insert — until all four middle edges are home. You are done when every edge left in the top layer shows yellow: the first two layers are solid, and only the yellow face remains.