The last layer permutes in 21 ways. You already own six of them — T-Perm, Y-Perm, Ua, Ub, H-Perm, Z-Perm — plus the skip. Seven outcomes, 20 of every 72 solves, finished in one look.
The other 15 cases you currently solve in two stages: permute corners, re-recognize, permute edges. Each algorithm below deletes one of those two-stage finishes. Nothing becomes obsolete — T and Y stay your workhorses.
Reading two sides
You never need to see the back of the cube. The front and right faces show six stickers, and those six identify all 21 cases. Read three shapes:
- 3-bar — corner, edge, corner all match: that face is solved as a unit.
- Headlights — the two corner stickers match, the edge between them doesn’t.
- 2-bar — a corner matches only its neighboring edge.
Shapes narrow the case; colors settle it — check whether a sticker matches, sits adjacent to, or sits opposite its neighbors. Learn each case’s front-plus-right picture together with its algorithm. Rotating the cube to hunt the back face costs more than the algorithm saves.
Corners only: A and E
Edges already solved, corners cycling. Today an A case costs T-Perm plus an edge algorithm — you break the solved edges, then repair them. One A-Perm keeps them intact. Aa and Ab are mirror cycles: same headlights, opposite direction. E is the corners-only case with no headlights anywhere — today it masquerades as a diagonal swap, costing Y-Perm plus edge repair.
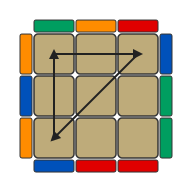 x L2 D2 L' U' L D2 L' U L'
SolvingAa-Perm
Starts at the case. Full colour is what this step solves, dim is already solved and has to survive it, grey is further down the method.
Open the full case page →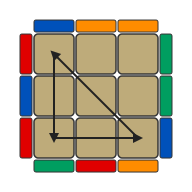 x' L2 D2 L U L' D2 L U' L
SolvingAb-Perm
Starts at the case. Full colour is what this step solves, dim is already solved and has to survive it, grey is further down the method.
Open the full case page →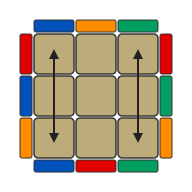 x' L' U L D' L' U' L D L' U' L D' L' U L D
SolvingE-Perm
Starts at the case. Full colour is what this step solves, dim is already solved and has to survive it, grey is further down the method.
Open the full case page →The adjacent-swap family
Two corners trade across one face — T-Perm’s home turf. The J, R, and F perms are the same corner swap with different edge motion; each one replaces a T-plus-edge-algorithm pair with a single execution.
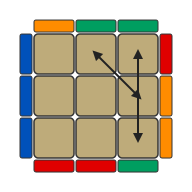 x R2 F R F' R U2 r' U r U2
SolvingJa-Perm
Starts at the case. Full colour is what this step solves, dim is already solved and has to survive it, grey is further down the method.
Open the full case page →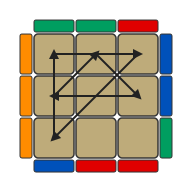 R U R' F' R U R' U' R' F R2 U' R'
SolvingJb-Perm
Starts at the case. Full colour is what this step solves, dim is already solved and has to survive it, grey is further down the method.
Open the full case page →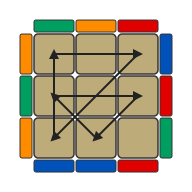 R U' R' U' R U R D R' U' R D' R' U2 R'
SolvingRa-Perm
Starts at the case. Full colour is what this step solves, dim is already solved and has to survive it, grey is further down the method.
Open the full case page →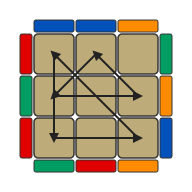 R2 F R U R U' R' F' R U2 R' U2 R
SolvingRb-Perm
Starts at the case. Full colour is what this step solves, dim is already solved and has to survive it, grey is further down the method.
Open the full case page →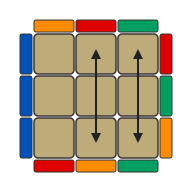 R' U' F' R U R' U' R' F R2 U' R' U' R U R' U R
SolvingF-Perm
Starts at the case. Full colour is what this step solves, dim is already solved and has to survive it, grey is further down the method.
Open the full case page →The diagonal family
No headlights on any side — today that means Y-Perm, then edge cleanup. V and the N perms finish these in one. The N perms are the easiest recognition on the sheet — the layer looks identical from every angle — and, at 1 in 72 each, tied with H-Perm for the rarest in PLL.
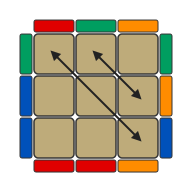 R' U R' U' y R' F' R2 U' R' U R' F R F
SolvingV-Perm
Starts at the case. Full colour is what this step solves, dim is already solved and has to survive it, grey is further down the method.
Open the full case page →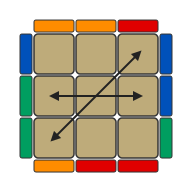 R U R' U R U R' F' R U R' U' R' F R2 U' R' U2 R U' R'
SolvingNa-Perm
Starts at the case. Full colour is what this step solves, dim is already solved and has to survive it, grey is further down the method.
Open the full case page →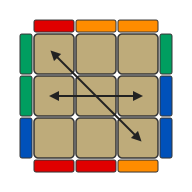 R' (U R U' R') F' U' F R U R' F R' F' R U' R
SolvingNb-Perm
Starts at the case. Full colour is what this step solves, dim is already solved and has to survive it, grey is further down the method.
Open the full case page →The G family — last, and one at a time
Four cases, 16 of every 72 solves, and the hardest recognition in PLL: both corners and edges cycle, so the two-sided patterns are subtle. Every G is currently T-Perm plus an edge case, and that fallback stays perfectly serviceable. Make the other eleven upgrades automatic first. Then add one G at a time — drill its front-plus-right pattern until recognition is instant before touching the next. Learning all four in a week guarantees mixing them up in solves.
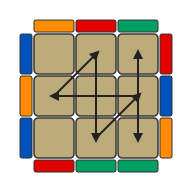 R2 U R' U R' U' R U' R2 (U' D) R' U R D'
SolvingGa-Perm
Starts at the case. Full colour is what this step solves, dim is already solved and has to survive it, grey is further down the method.
Open the full case page →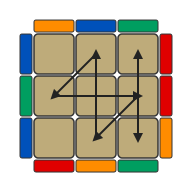 R' U' R (U D') R2 U R' U R U' R U' R2 D
SolvingGb-Perm
Starts at the case. Full colour is what this step solves, dim is already solved and has to survive it, grey is further down the method.
Open the full case page →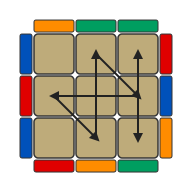 R2 U' R U' R U R' U R2 (U D') R U' R' D
SolvingGc-Perm
Starts at the case. Full colour is what this step solves, dim is already solved and has to survive it, grey is further down the method.
Open the full case page →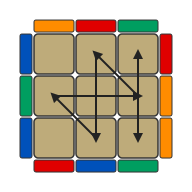 R U R' (U' D) R2 U' R U' R' U R' U R2 D'
SolvingGd-Perm
Starts at the case. Full colour is what this step solves, dim is already solved and has to survive it, grey is further down the method.
Open the full case page →