Centers built, edges paired — your 4×4 is now a scaled-up 3×3. Every edge pair moves as one piece, every center block is a fixed color. Solve it with the method you already own: cross, first two layers, yellow cross, corners, permutation.
Outer layers only
From here, turn only the outer layers. R, U, F mean the outermost layer, exactly as on a 3×3. An inner-slice turn splits your paired edges and undoes reduction — if a pair ever comes apart mid-solve, you turned the wrong layer.
Parity is expected, not broken
Reduction hides two coin flips. It can leave the cube in a state no 3×3 can reach — and each of the two parities does so half the time, independently. When your last layer matches no case you know, nothing is wrong with your cube. It’s parity: run the fix, then continue as normal.
OLL parity: an odd number of flipped edges
On a 3×3, the yellow-cross stage always shows 0, 2, or 4 oriented edges — Dot, Hook, Line, or cross. On a 4×4 you can see 1 or 3. An odd count is OLL parity: one dedge is flipped in place, and no edge-orientation algorithm will ever resolve it. Apply the fix the moment you count an odd number — before any other last-layer work — then build the yellow cross as usual.
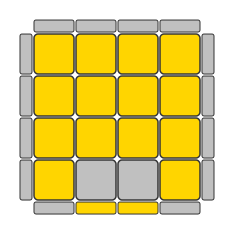 Rw U2 x Rw U2 Rw U2 Rw' U2 Lw U2 Rw' U2 Rw U2 Rw' U2 Rw'
SolvingOLL Parity (4×4)
Starts at the case. Full colour is what this step solves, dim is already solved and has to survive it, grey is further down the method.
Open the full case page →PLL parity: two pieces swapped
The second parity surfaces at the very end: two dedges swapped — a 2-swap that’s impossible on a 3×3, which is why no PLL you know matches it. One algorithm handles it:
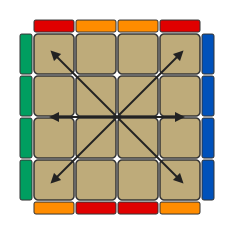 2R2 U2 2R2 Uw2 2R2 Uw2
SolvingPLL Parity (4×4)
Starts at the case. Full colour is what this step solves, dim is already solved and has to survive it, grey is further down the method.
Open the full case page →You do not need a second version for the case where the swapped pairs are adjacent rather than opposite. Run this algorithm anyway: it fixes the parity, and what it leaves behind is an ordinary PLL — a U-perm — that you already know. That is the whole rule, and it is why one algorithm is enough: when no PLL matches, run parity once, then finish with a normal PLL.
Any other unmatchable ending reduces to the same thing: a lone corner swap, for instance, is one T- or Y-perm from an edge swap. Permute what you can with your normal PLLs, and parity is what remains.
Two looks is enough
2-Look OLL and PLL plus the two algorithms above finish any 4×4. Faster solvers later replace them with parity-embedded cases — a single algorithm that orients or permutes and fixes the parity in one go. Each one is a last-layer algorithm you already know with the parity fix spliced into it, so they cost recognition, not understanding. That is a speed refinement, not a gap in the method — and Cubepath does not teach them yet, so the reference ships only the two cases above.